What are you looking for?

Ej: Medical degree, admissions, grants...

Admissions:
Valencia: +34 961043883
Alicante: +34 965051793
Canarias: +34 922097091
Escuela Universitaria Real Madrid: +34 911128850
Students:
Valencia: +34 961043880
Alicante: +34 961043880
Canarias: +34 922985006
Whatsapp
Medicine and Health
29 dec 2021

Dental photography: What is it and how to take good images?

Edited on 08 June 2023
fotografia-dental

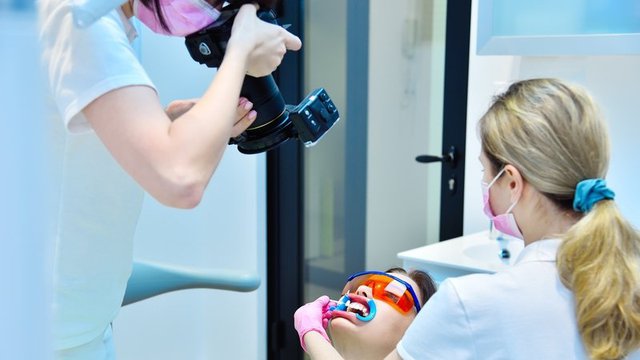
For some time now, photography has become a key tool when carrying out a multitude of dental treatments, such as those related to oral surgery, dental aesthetics, implantology, conservative dentistry, orthodontics or periodontics, to name but a few.

In this post, we tell you everything you need to know about dental photography and how to have it professionally taken. And if you’d like to become in expert in how to a take dental images, you should consider studying a Degree in Dentistry in Madrid, Degree in Dentistry in Valencia or a Degree in Dentistry in Alicante at Universidad Europea.

What are dental photographs for?

Dental photography has many functions and, for this reason, professionals in all fields across the dentistry specialities, are increasingly using them to optimise their work and establish good communication with the patient.

Today, dental imaging is an important resource when it comes to:

  • Analysing the oral anatomy of each patient in detail.
  • Graphically documenting clinical cases and thus facilitating their follow-up: the initial conditions from which they were started, the progression of the changes and the end result.
  • Communicate with other dental professionals and the dental laboratory.
  • Visually show patients the treatment to be applied to them and thus help them to understand it better.
  • Reach a larger number of patients if used for commercial and advertising purposes, together with a good marketing strategy for dental clinics.

Types of dental images

Dental photographs are divided into 3 groups. These are:

Extraoral

These are photographic shots that frame the full face of the patient, both front and profile, as a portrait.

These are made up of:

  • Frontal with lips at rest and with forced smile.
  • Right and left profile
  • 45-degree view
  • Front and profile with Fox plate
  • Lip seal
  • Forced smile front
  • Right and left profile smile
  • 45-degree smile view
  • Overjet or incisal protrusion (horizontal distance between upper and lower incisor)

Intraoral

This type of dental imaging is used to accurately capture the hard and soft tissues inside the patient's mouth to better observe the relationships between them.

They consist of:

  • Front with teeth in occlusion
  • 45-degree view of teeth in occlusion
  • Forehead with teeth in functional protrusive, right lateral and left lateral positions.
  • Upper and lower front with black background
  • Right and left lateral in occlusion
  • Upper and lower occlusal
  • Detail drawings of specific areas

Complementary

These dental photographs are a way of documenting all the tests performed on a patient and, in this way, keeping track of the treatment. Complementary dental images are usually attached to the patient's medical record.

They can show

  • Dental diagnostic models
  • X-rays
  • Dental instruments and materials used

What equipment is needed for dental photography?

In general, a basic dental imaging kit contains the following items:

Camera body

It is best to use SLR cameras with interchangeable lenses. Nowadays, there are many brands on the market and models suitable for both beginners and experts.

Macro lens (focal length 60 to 100 mm)

This lens allows you to set a minimum focusing distance and take dental photographs from very close up.

Flash

The flash is of vital importance due to the fact that the mouth is dark and the proximity with which the camera is held is very close. However, the flash that comes as standard on cameras does not usually give really good results, as the illumination is not very uniform because it is located on the top of the device.

Instead, it is advisable to use other types of lighting, for example:

  • Ring flash: this is circular and is placed around the lens of the camera.
  • Twin flash: like the previous one, it is an external system and has a ring that fits over the lens. It has two heads to play with the direction of the light and adjust it to each situation.

Accessories

These are tools that come into contact with the patient's oral cavity (hence the importance of proper sterilisation after each use) and are used to better capture dental images.

Some of the most used in dental photography sessions are:

  • Retractors: they are used to leave the mouth and teeth uncovered by moving the cheeks, lips and tongue out of the way. They can be made of plastic or metal.
  • Dental or oral mirrors: they help to see the teeth indirectly, that which is not visible to the naked eye. They usually come in different sizes and, in terms of material, are made of polished metal or glass coated with a reflective surface.
  • Dental contrast devices: these are accessories of different shapes and sizes that allow you to take pictures of teeth against a black background. They can be made of aluminium, silicone-coated metal or plastic.

If you decide to study one of our dentistry programmes, you will get plenty of opportunities to learn and practice dental photography before you launch your professional career. We have a simulated hospital and medical facilities where you will initial work on your technique and throughout the degree you will also complete more than 400 hours of clinical practice and one of our centres.